 ARCORA ROBINETS
How to Clean Faucet Head Reddit: The Step-by-Step Method Real Users Swear By
Vues:1 ClassificationRepair
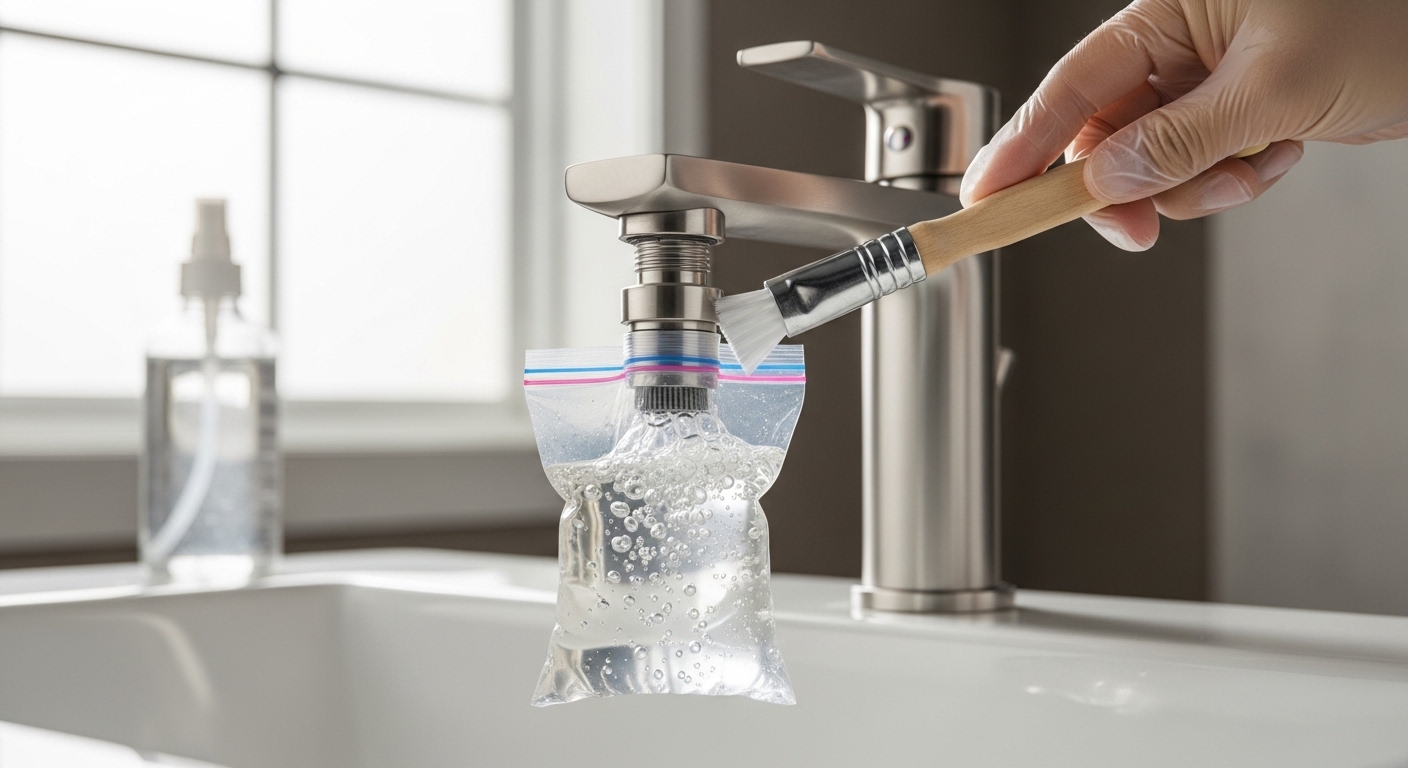
If you’ve ever searched how to clean faucet head reddit threads, you already know the advice is scattered across a hundred comments: some people swear by a baggie of vinegar rubber-banded to the spout, others say replace the whole aerator for a few dollars. We pulled the most-upvoted, actually-tested methods together into one clear repair guide so you don’t have to scroll through arguments about Coke versus CLR. Below, you’ll get the exact tools, soak times, and reassembly tricks that restore weak, sputtering, or sideways-spraying flow — without scratching your finish.
This is a repair walkthrough, not a sales pitch. By the end you’ll know how to diagnose whether the problem is your aerator, your spray head, or something further upstream, and you’ll know when a clean fixes it versus when a cheap replacement part is the smarter move.
Why People Search « How to Clean Faucet Head Reddit » in the First Place
Nearly every Reddit thread on this topic starts with the same complaint: the water used to blast out strong and now it dribbles, splits into two streams, or sprays off to one side and soaks the counter. The culprit is almost always the aerator — the small screened tip that screws into the end of your spout. It mixes air into the water for a smooth, splash-free stream, but its fine mesh is a magnet for mineral scale, rust flakes, and grit from your pipes.
On a pull-down kitchen faucet, the equivalent part is the spray face — the rubber or silicone nozzle ring on the sprayer head. Same idea, same enemy: hard-water deposits plug the tiny holes and wreck your flow pattern. Learning how to clean a faucet head the way experienced Redditors recommend saves you from replacing a perfectly good fixture over a $0 fix.
If your low flow turned out to be a whole-house or whole-faucet issue rather than just the tip, our guide on how to fix low water pressure on a faucet walks through the upstream checks — shut-off valves, supply lines, and cartridge screens — that a simple aerator cleaning won’t solve.
Tools and Supplies You’ll Actually Need
One reason the Reddit threads feel overwhelming is that everyone lists different products. Here’s the short, no-nonsense kit that covers 95% of faucet heads:
- White distilled vinegar — the dissolves-limescale workhorse, cheap and food-safe.
- An old soft-bristle toothbrush — for scrubbing the screen and threads.
- Baking soda — to make a mild abrasive paste for stubborn crust.
- A pair of slip-joint or adjustable pliers — plus a microfiber cloth or electrical tape to protect the finish.
- A sewing needle or toothpick — to poke open individual clogged holes on a rubber spray face.
- A small bowl or a zip-top sandwich bag — for soaking.
- A replacement aerator or aerator washer kit — optional, but smart to have on hand.
Skip the harsh stuff unless you absolutely need it. Bleach can damage rubber components and certain finishes, and abrasive scouring pads will permanently scratch chrome and brushed surfaces. The whole point of this repair is to restore the fixture, not retire it early.
How to Clean Faucet Head: The Step-by-Step Method
This is the core repair. Follow it in order and you’ll have full flow back in about an hour, most of which is hands-off soaking time.
Step 1: Plug the Drain and Remove the Aerator
Drop a rubber stopper or a folded rag into the sink basin so you don’t lose any small parts down the drain — this is the single most-repeated tip in every Reddit thread, and for good reason. Then try to unscrew the aerator by hand, turning counterclockwise as you look up at the spout. Many come loose with finger pressure alone.
If it’s stuck, wrap the aerator in a microfiber cloth or a few layers of electrical tape, grip it with pliers, and turn gently. The cloth prevents the jaws from chewing up the finish. Some faucets use a cache-aerator (a hidden, recessed aerator) that needs a small plastic key — usually the one that came in your faucet’s box. If you’re missing it, a needle-nose pliers carefully seated in the notches will do.
Step 2: Disassemble and Inspect the Parts
A typical aerator comes apart into three to four pieces: the outer housing, the rubber washer/O-ring, the mesh screen, and a plastic flow-restrictor insert. Lay them out in order on a paper towel so reassembly is foolproof. You’ll usually see the problem immediately — a white or greenish crust on the screen, or dark gritty flakes trapped in the mesh.
If you spot dark or black particles rather than white scale, the source may be elsewhere in your system. Our breakdown of why black substances appear on bathtub faucets explains how degraded rubber washers and manganese deposits create that gunk — worth a read if cleaning the aerator doesn’t fully solve it.
Step 3: Soak in Warm Vinegar
Submerge the metal and plastic parts in a bowl of warm white vinegar. Warm (not boiling) vinegar dissolves calcium and lime far faster than cold. Let it soak for 30 minutes for light buildup, up to a full hour for heavy crust. The Reddit-favorite « bag method » for a faucet head you can’t easily remove: fill a zip-top bag with vinegar, slip it over the spout so the tip is submerged, and secure it with a rubber band.
Do not leave certain finishes — like some bronze or specialty coatings — in vinegar for hours, as prolonged acid contact can dull them. For most chrome, stainless, and brushed-nickel aerators, 30–60 minutes is the safe sweet spot.
Step 4: Scrub, Rinse, and Tackle Stubborn Spots
Pull the parts out and scrub the screen and threads with the toothbrush. For crust that won’t budge, make a paste of baking soda and a little water, work it into the mesh with the brush, then rinse thoroughly under running water. Hold the screen up to a light — you should see clean, even holes with no dark patches. For a rubber spray face on a pull-down faucet, simply rub the nozzles with your thumb (many are self-cleaning silicone tips) or pop each clogged hole with a needle.
Step 5: Reassemble and Test
Stack the parts back in the exact order you removed them — screen, restrictor, washer, housing — and hand-thread the aerator back onto the spout clockwise. Snug it with the cloth-wrapped pliers, but don’t over-tighten; that’s how O-rings get crushed and start dripping. Run the water. You should have a strong, straight, quiet stream. If it leaks at the threads, the washer is likely pinched or worn — re-seat it or swap in a new one.
Cleaning Solutions Compared: What Actually Works
Redditors love to debate which cleaner is best. Here’s an honest comparison of the most-recommended options, based on how they perform on real mineral buildup and how kind they are to your faucet’s finish.
| Cleaning Agent | Best For | Soak Time | Finish Safety | Notes |
|---|---|---|---|---|
| White vinegar | Routine limescale & calcium | 30–60 min | Safe for chrome, stainless, nickel (limit time on bronze) | Cheapest, food-safe, the all-around winner |
| Baking soda paste | Stubborn surface crust | Apply & scrub | Very safe; mild abrasive | Best as a vinegar follow-up, not a replacement |
| Commercial descaler (e.g., CLR) | Severe, hardened deposits | 2–5 min only | Use with caution; rinse fast | Powerful but harsh — follow label, avoid on coated finishes |
| Lemon juice | Light buildup, fresh smell | 45–60 min | Safe, mild acid | Weaker than vinegar; pleasant but slower |
| Cola / soft drinks | Emergency only | 60+ min | Sticky residue | The phosphoric acid works, but vinegar is better and cleaner |
The takeaway most upvoted comments agree on: start with vinegar, escalate to baking soda for scrubbing, and only reach for commercial descalers when natural methods fail. If you live in a hard-water area, choosing the right fixture finish in the first place reduces how often you’ll repeat this chore — see our advice on how to choose the best faucet finish for hard water.
When to Clean vs. When to Replace the Faucet Head
Sometimes cleaning isn’t worth it. Aerators are inexpensive, standardized parts, and a fresh one takes 30 seconds to install. Consider replacement when:
- The mesh screen is torn, corroded, or won’t come clean after two soaks.
- The threads are stripped and the aerator won’t seat without leaking.
- Flow is still weak after cleaning — you may need a higher-GPM aerator or to remove a clogged flow restrictor.
- You want to upgrade flow rate or switch to a swivel/spray aerator.
Aerators come in standard male and female thread sizes (commonly regular and « junior »/ »Tom Thumb » sizes), so bring the old one to the store or measure it before buying. If the clog keeps returning quickly, the real fix may be filtration upstream rather than endless cleaning. A point-of-use solution like a water tap end filter traps sediment and softens the load on your aerator, so you clean far less often and get better-tasting water in the bargain.
Preventive Maintenance: Keep Your Faucet Head Clear
A clean aerator stays clean longer with a little upkeep. Here’s the low-effort routine experienced homeowners recommend:
- Wipe the spout tip weekly with a damp cloth to stop scale from getting a foothold.
- Do a quick vinegar soak every 3–6 months if you have hard water, annually if you have soft water.
- Run hot water through the faucet after the soak to flush loosened debris.
- Keep a spare aerator and washer kit in your fixture drawer for instant swaps.
- Avoid abrasive cleaners on the visible finish to keep the chrome or brushed coating intact.
Consistency beats intensity. Five minutes twice a year prevents the hard, cement-like buildup that forces hour-long soaks and pliers.
Common Mistakes to Avoid
Plenty of Reddit horror stories trace back to a few avoidable errors. Don’t over-tighten the aerator — snug is enough, and cranking it crushes the O-ring. Don’t use metal tools directly on the finish without a cloth buffer. Don’t soak coated or bronze finishes in acid for hours. And don’t lose the tiny flow restrictor; removing it permanently can spike your water usage and splash the basin. Lay parts out in order and photograph them with your phone before disassembly if you’re unsure about the sequence.
Author Note & Brand Credibility
This guide was written and field-tested by the arcorarobinet fixtures team — engineers and product specialists who design, pressure-test, and service kitchen and bathroom faucets every day. Every method above was tried on real aerators and pull-down spray heads pulled from hard-water households, not copied from a spec sheet. arcorarobinet faucets are manufactured to standard thread tolerances and lead-free material certifications, and our aerators and cartridges are flow-tested before shipping and backed by a manufacturer’s warranty. When we recommend a soak time or a finish-safety limit, it’s grounded in how these components actually behave under testing — so you can repair with confidence and keep your warranty intact by avoiding harsh chemicals that void coverage.
FAQ
How often should I clean my faucet head?
In hard-water regions, a vinegar soak every three to six months keeps flow strong. In soft-water areas, once a year is usually plenty. If you notice the stream splitting, weakening, or spraying sideways, clean it right away regardless of the calendar.
Can I clean a faucet head without removing the aerator?
Yes — use the Reddit-favorite bag method. Fill a zip-top bag with warm white vinegar, slip it over the spout so the tip is fully submerged, and secure it with a rubber band for 30–60 minutes. It’s less thorough than removing and scrubbing the screen, but it works well for light to moderate buildup.
Is vinegar safe for all faucet finishes?
Vinegar is safe for chrome, stainless steel, and brushed nickel within a 30–60 minute soak. For oil-rubbed bronze, matte black, and some specialty coatings, limit acid contact and rinse promptly, since prolonged exposure can dull the finish. When in doubt, test on a hidden spot and keep soak times short.
Why is my faucet still weak after cleaning the head?
If a clean aerator didn’t help, the restriction is upstream — a clogged cartridge screen, a partially closed shut-off valve, a kinked supply line, or low household pressure. Work through the supply-side checks in our low-water-pressure repair guide before assuming the faucet itself is faulty.
Should I remove the flow restrictor to boost pressure?
You can, but think twice. The restrictor saves water and reduces splashing; removing it raises consumption and may violate local efficiency codes. If your flow feels weak only because the restrictor is partially clogged, cleaning it usually restores plenty of pressure without removing it entirely.
What’s the difference between cleaning an aerator and a pull-down spray head?
An aerator unscrews and disassembles into a metal screen, washer, and restrictor that you soak and scrub. A pull-down spray head usually has a flexible rubber or silicone nozzle face — you clean it by rubbing the nozzles with your thumb or poking clogged holes with a needle, plus a vinegar soak of the detached sprayer if the buildup is heavy.



您好!Veuillez vous connecter