 ARCORA ROBINETS
Why Is My Bathtub Faucet Leaking, and Is a Leaky Bathtub Faucet Cartridge the Cause?
Vues:0 ClassificationRepair
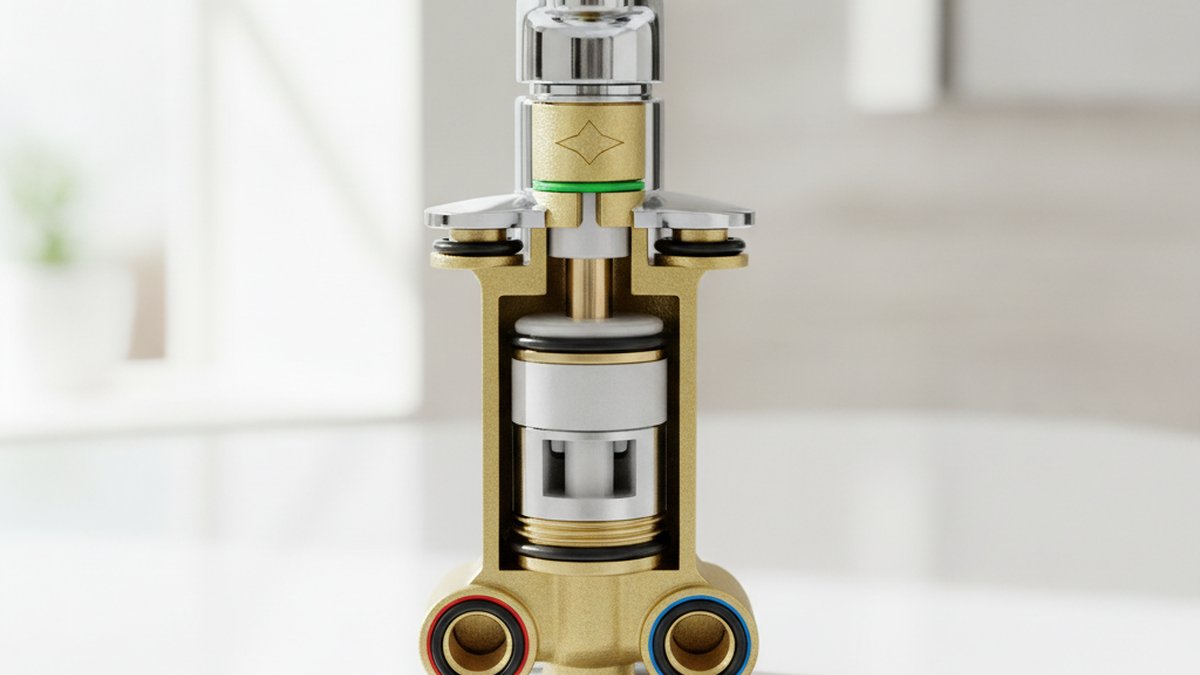
If your tub keeps dripping after you’ve shut the handle off tight, a leaky bathtub faucet cartridge is the number-one suspect. The cartridge is the heart of a modern single-handle tub valve: it’s the sleeve of plastic, brass, and rubber O-rings that opens, mixes, and seals off your hot and cold water. Over years of use, those rubber seals harden, mineral scale scores the moving surfaces, and the cartridge can no longer close completely — so water sneaks past and drips out of the spout or seeps around the handle. The good news is that replacing it is one of the most beginner-friendly plumbing repairs there is.
Below I’ll walk you through exactly how to confirm the cartridge is the problem, how to pick the right replacement, and how to swap it out step by step — plus the small mistakes that turn a 30-minute job into a soaked weekend.
How do I know if my bathtub faucet leak is actually the cartridge?
You know it’s the cartridge when the tub drips even though the handle is fully off, or when water leaks out around the handle base while it’s running. Those two symptoms point straight at a failed cartridge, because the cartridge is the only part responsible for sealing the water off and keeping it inside the valve body.
Here’s how to tell the cartridge apart from the other usual suspects:
- Drip from the spout, handle off → the cartridge (or, on older tubs, the rubber seats and springs) can’t seal. This is the classic leaky cartridge signature.
- Water weeping around the handle when running → the cartridge’s outer O-rings have failed. Still a cartridge job.
- Drip only from the tub spout while the shower runs → that’s usually the spout diverter, not the cartridge — a different fix. We cover that in our guide on why your tub spout keeps dripping water and how to stop it for good.
- Screeching, chattering, or humming when the water is on → that points to a loose or worn cartridge too, and it often shows up alongside a leak — see why your bathtub faucet is so loud and how to fix it.
One quick confirmation test: shut off the water supply to the tub, then open the handle. If the drip stops immediately and the spout runs dry after a few seconds, the leak is coming from the valve — not the supply lines or spout connection — and the cartridge is your fix.
Should I repair the cartridge or replace the whole tub faucet?
Replace the cartridge, not the whole faucet — in about 90% of leaky-tub cases. The cartridge is a wear part designed to be swapped, and a new one restores factory-tight sealing for a fraction of the cost and effort of tearing out the valve body, which is soldered into your wall.
Replacing the entire valve means opening the wall, cutting and re-sweating copper (or crimping PEX), and often re-tiling — a genuine renovation. Replacing the cartridge means pulling one part out through the existing hole. Here’s the honest comparison:
| Option | Typical cost | Time | Skill level | When it makes sense |
|---|---|---|---|---|
| Replace the cartridge | $15–$40 part | 30–60 min | Beginner DIY | Valve body is sound; just leaks or drips |
| Rebuild kit (seats, springs, O-rings) | $8–$20 | 45–90 min | Beginner–intermediate | Older compression/two-handle valves |
| Replace whole valve body | $150–$600+ (with labor) | Half to full day | Advanced / plumber | Cracked valve body, corroded beyond repair, or you’re remodeling |
The only time I’d skip straight to a full valve replacement is if the brass valve body itself is cracked or so corroded that the cartridge won’t seat — rare, but it happens on fixtures 25+ years old. If your whole fixture is that ancient and seized, our walkthrough on how to remove a 20-year-old bathroom faucet that won’t budge has the penetrating-oil and heat tricks you’ll need.
How do I replace a leaky bathtub faucet cartridge myself?
You replace a leaky bathtub faucet cartridge by shutting off the water, pulling the handle and trim, removing the retaining clip, extracting the old cartridge, and sliding in the identical new one. Here’s the full sequence — most people finish in under an hour on their first try.
- Shut off the water. Use the tub’s dedicated shutoffs if you have them (sometimes behind an access panel), otherwise close the home’s main supply. Open the tub handle to bleed off pressure and confirm the water’s really off.
- Plug the drain. Drop in the stopper or lay a rag over it. This is non-negotiable — the tiny retaining clip will try to escape down the drain.
- Remove the handle. Pop off the decorative index cap and loosen the set screw with an Allen key (usually 1/8″ or 3/32″). Pull the handle straight off.
- Remove the trim. Unscrew the escutcheon (the round wall plate) and any sleeve or bonnet nut covering the cartridge stem.
- Pull the retaining clip. A small U-shaped brass or plastic clip holds the cartridge in place. Pry it out with needle-nose pliers or a small flat screwdriver and set it somewhere safe.
- Extract the old cartridge. Grip the stem with pliers and pull straight out while twisting gently. If it’s stuck with scale — and it often is — use a brand-matched cartridge puller tool. Never yank sideways.
- Install the new cartridge. Lightly coat the new O-rings with silicone (plumber’s) grease, note the hot/cold orientation (there’s usually a « H »/ »C » mark or a flat/notch that must face up or a specific direction), and press it in until it seats fully.
- Reassemble in reverse. Clip, bonnet, escutcheon, handle. Turn the water back on slowly, and cycle the handle hot–cold a couple of times to purge air before you check for drips.
If you happen to have a Delta valve, the process is nearly identical but the cartridge and clip look a little different — we’ve got a Delta-specific version in how to do a shower faucet cartridge replacement on a Delta valve yourself, and it applies to Delta tub/shower valves too.
What’s the right replacement cartridge for my tub — and how do I identify it?
The right cartridge is the exact one built for your valve’s brand and model — cartridges are not universal, and a « close enough » part will leak or won’t seat at all. Identify it by the brand stamped on the trim, the shape of the old cartridge, and the model number if you can find it.
Here’s how to nail the identification:
- Find the brand. Look for a logo on the handle, escutcheon, or spout — Moen, Delta, Kohler, Pfister, American Standard, and Grohe all use distinct cartridge designs.
- Take the old one to the store. The single most reliable method: pull the old cartridge and match it physically. Length, spline count, and O-ring placement all matter.
- Match by valve family, not just brand. Moen alone uses the 1200, 1222, and 1225 cartridges for different valves; grabbing the wrong Moen part is the most common mistake.
- Check the warranty first. Many major brands (Moen and Delta both offer limited lifetime warranties) will mail you a free replacement cartridge if you’re the original owner. Always worth a five-minute phone call before you buy.
Here’s a quick reference for the most common single-handle tub cartridges you’ll run into:
| Brand | Common cartridge | Telltale sign | Special tool? |
|---|---|---|---|
| Moen | 1222 / 1225 | Brass or plastic body, notched stem | Moen puller (104421) helps |
| Delta | RP19804 / RP46074 | Often uses seats & springs behind it | Usually not |
| Kohler | GP series (e.g. GP76851) | Ceramic-disc, quarter-turn feel | Sometimes |
| Pfister | 974-042 / 974-291 | Metal stem, plastic housing | No |
Note that some older Delta and two-handle valves don’t use a cartridge at all — they use rubber seats and springs. If your handle turns more than a half-turn and feels like it’s compressing something, you likely have a compression valve, and the fix is a cheap seats-and-springs rebuild kit rather than a cartridge.
Why does my new bathtub cartridge still leak after I replaced it?
If the leak persists after a fresh cartridge, the usual culprits are a wrong or mis-oriented cartridge, debris caught on the O-rings, or dry seals that got nicked going in. Nine times out of ten it’s an install detail, not a defective part.
Run through this checklist before you assume the new cartridge is bad:
- Wrong orientation. If you installed it rotated (hot/cold flipped or the alignment notch off), it won’t seal in the « off » position. Pull it and check the alignment mark.
- No silicone grease. Dry O-rings drag and can roll or tear on the way in. Always grease them with plumber’s silicone, never petroleum jelly, which degrades rubber.
- Debris in the valve. A grain of scale or a fleck of old O-ring on the sealing surface holds it open a hair. Flush the valve body with the cartridge out before installing the new one.
- Not seated fully. If the cartridge isn’t pushed all the way home before the clip goes in, it can’t seal. The clip should slide in freely — if you’re forcing it, the cartridge isn’t deep enough.
- The leak was never the cartridge. If it drips only during a shower, you’re chasing the diverter or spout, not the valve.
For deep-set or extra-long valves — common on some Roman tub and older wall setups — you may find the cartridge sits too far back to reach or seal properly. That’s a job for a stem extension; here’s when and how to use one: do you really need a Moen Roman tub faucet stem extension.
How much does it cost to fix a leaky bathtub faucet cartridge, and is it worth doing myself?
Doing it yourself costs $15–$60 in parts; hiring a plumber runs $150–$350 including the trip charge and labor. For a straightforward single-handle cartridge swap, DIY is absolutely worth it — the repair is low-risk and the part is cheap.
Beyond the sticker price, there’s a real reason not to sit on a drip: a faucet leaking one drip per second wastes roughly 3,000 gallons a year, and a warm-water leak drives up both your water and heating bills. A slow leak also keeps the surrounding grout and drywall damp, which invites mold. A worn cartridge isn’t just annoying — it’s a small warning sign, the same way a dripping faucet anywhere in the house is. If you want the full picture on what a persistent drip is really telling you, read the real meaning of a dripping faucet — annoyance or warning sign.
Call a pro only if: your valve has no accessible shutoff and you’re uneasy killing the whole-house main, the cartridge is seized so hard the puller can’t budge it, or you discover the valve body itself is cracked. Otherwise, the total tool investment — Allen keys, needle-nose pliers, a cartridge puller, and silicone grease — is under $40 and pays for itself on the first repair.
FAQ
How long does a bathtub faucet cartridge last?
A quality cartridge typically lasts 5–15 years. Hard water shortens that dramatically — mineral scale scores the sealing surfaces and stiffens the O-rings, so in very hard-water areas you may be replacing one every 3–5 years. Using silicone grease at install and periodically exercising the handle through its full range helps them last longer.
Can I replace a bathtub cartridge without turning off the main water supply?
Only if your tub valve has its own integral shutoffs (some do, hidden behind an access panel or built into the valve). If there are no local shutoffs, you must close the home’s main supply — pulling a cartridge under full line pressure will spray water forcefully into the room. When in doubt, shut off the main.
Do I need a special tool to remove a stuck bathtub cartridge?
Often, yes. Cartridges that have been in place for years get cemented by mineral scale, and a brand-matched cartridge puller (Moen and Delta both sell one) grips the stem and pulls it straight out without breaking it off inside the valve. For a lightly stuck cartridge, needle-nose pliers with a firm straight pull and gentle twist can be enough.
Are bathtub faucet cartridges universal or interchangeable?
No — cartridges are specific to the brand and often the exact valve model. A Moen cartridge won’t fit a Delta valve, and even within Moen the 1222 and 1225 aren’t interchangeable. The safest approach is to pull the old cartridge and match it physically, or look up your valve’s model number.
Why does my bathtub faucet drip only when the shower is running?
That’s usually the tub spout diverter, not the cartridge. When the diverter doesn’t fully redirect water to the showerhead, some escapes back out the spout. The cartridge controls on/off and temperature; the diverter routes water between spout and shower. If the drip only happens in shower mode, replace the spout or diverter rather than the cartridge.
Can a leaky cartridge cause low water pressure too?
It can. A cartridge clogged with mineral debris or a partially failed one can restrict flow as well as leak. If you’re also seeing weak flow, clean or replace the cartridge and check the aerator — the same scale that ruins seals also chokes water passages.
About the author: This guide was written by the arcorarobinet fixtures team, drawing on hands-on bench testing of single-handle tub and shower valves from Moen, Delta, Kohler, and Pfister. We’ve pulled, matched, and reseated hundreds of cartridges and documented the failure points so you don’t have to guess.
About arcorarobinet: arcorarobinet is a specialist faucet and bathroom-fixtures brand. Every cartridge and valve we sell is tested against standard pressure-cycle and drip-tightness benchmarks (aligned with ASME A112.18.1 / CSA B125.1 fixture standards), and our replacement cartridges are backed by a manufacturer warranty. When possible, always check your original faucet’s warranty first — major brands frequently supply replacement cartridges free to the original owner.



您好!Veuillez vous connecter