 ARCORA ROBINETS
What Size Is a Kitchen Faucet Handle Replacement Screw, and How Do You Get It Loose?
Vues:0 ClassificationRepair
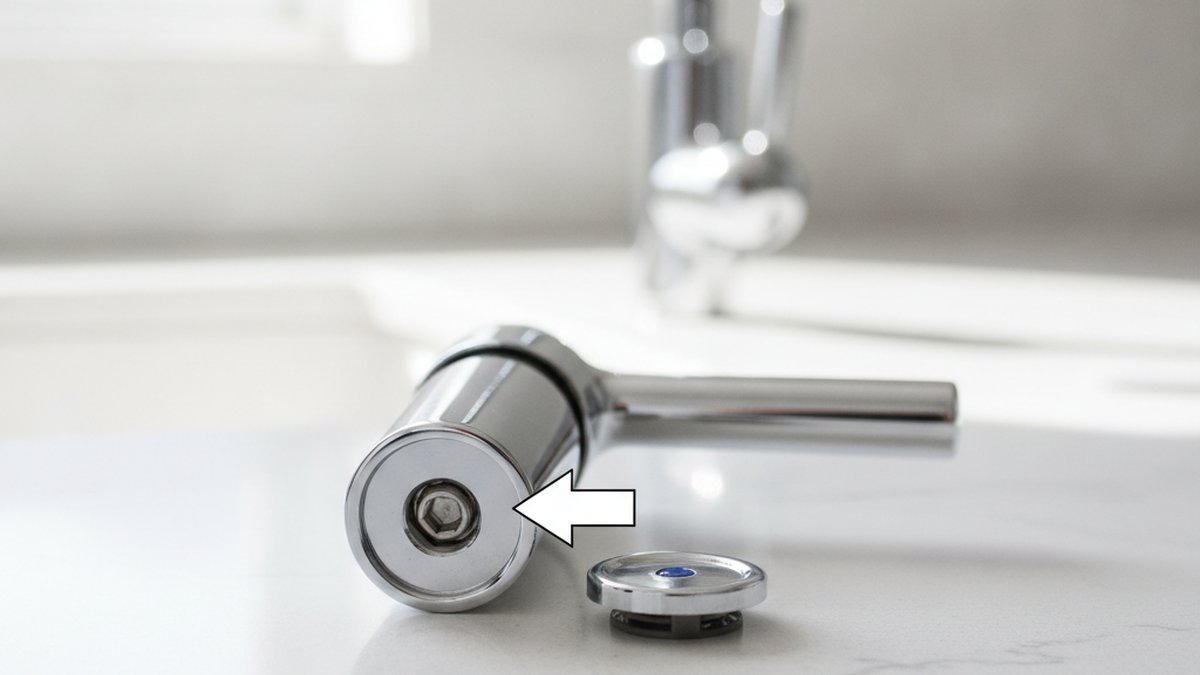
If you’re staring at a loose, wobbly, or stuck handle, the part you’re chasing is almost always the kitchen faucet handle replacement screw — the small set screw that clamps the handle onto the valve stem. It’s the cheapest part on the whole faucet, usually under a dollar, yet it’s the one thing standing between you and a handle that turns, tightens, and stops dripping onto the counter. The good news: replacing it is a 10-minute job with one Allen key, and you almost never need a plumber. The tricky part is finding the screw, knowing the right size, and dealing with it when it’s corroded or stripped. Let’s walk through all of it.
Where is the handle screw hidden on a kitchen faucet?
On most single-handle kitchen faucets, the set screw is hidden underneath or behind the handle — look for a small decorative button cap (often marked red/blue or with a brand logo) or a slot on the underside of the lever. Pop the cap off with a flathead screwdriver or fingernail, and the recessed hex screw sits right underneath.
The exact location depends on the faucet style:
- Single-lever pull-down faucets (Moen, Delta, Kohler, arcorarobinet): the set screw is almost always on the underside or back of the lever handle, pointing horizontally into the handle base. You’ll need to reach under with a short-arm Allen key.
- Cross or lever handles on a two-handle faucet: the screw hides under a snap-on index cap on top of each handle. Pry the cap up and you’ll see either a hex set screw or a Phillips screw.
- Joystick / ball-style faucets: the set screw is on the collar just below the ball, again a small hex screw.
What size Allen wrench and screw does a kitchen faucet handle use?
Most kitchen faucet handle set screws take a 7/64″ or 3/32″ Allen (hex) key, and the screw itself is typically a 10-24 or M4 stainless set screw about 1/4″ to 3/8″ long. A smaller number of European and premium faucets use a 2.5 mm or 3 mm hex, and a few older or budget two-handle faucets use a #8 or #10 Phillips screw instead.
Here’s the reality that trips people up: there is no single universal size. A brass or zinc set screw stripped out because someone used a slightly-too-small key and rounded the socket. So before you buy a replacement, measure. The safest move is to remove the old screw (or the whole handle) and take it to a hardware store, or measure the thread diameter with calipers. Below is a quick reference for the sizes you’ll actually run into.
| Faucet type / brand style | Common set screw thread | Hex key size | Typical length |
|---|---|---|---|
| Single-lever pull-down (most US brands) | 10-24 or M4 | 7/64″ or 3/32″ | 1/4″–3/8″ |
| Moen single-handle (many models) | Proprietary / 3/32″ hex | 3/32″ | ~5/16″ |
| European / imported (Grohe-style) | M4 metric | 2.5 mm or 3 mm | 6–10 mm |
| Two-handle with index cap | 8-32 or #10 | Phillips #2 or 7/64″ hex | 3/8″–1/2″ |
| Ball-style (collar set screw) | 10-24 | 1/8″ | ~1/4″ |
When in doubt, buy a small assortment pack of stainless set screws in both imperial and metric — it costs a few dollars and saves a second trip. Always choose stainless steel over the original zinc or brass; stainless resists the constant humidity under a kitchen sink and won’t seize up in five years.
How do you remove a kitchen faucet handle to replace the screw?
To remove the handle, turn off the water isn’t even necessary for just the screw — but shut off the two supply valves under the sink anyway if you plan to pull the handle and check the cartridge. Then pop the decorative cap, insert the correct hex key fully into the set screw, and turn counterclockwise to loosen. Once the screw is out or backed off enough, the handle lifts straight up off the valve stem.
Step by step:
- Close the shutoff valves under the sink (turn clockwise) and open the faucet to release pressure. This is optional for just swapping the screw, but do it if the handle is coming all the way off.
- Remove the index cap. Gently pry the button/logo cap with a small flathead wrapped in tape so you don’t scratch the finish.
- Seat the hex key fully. Push the Allen key all the way in before applying force — a half-seated key is the #1 cause of stripped set screws.
- Loosen counterclockwise. The screw only needs to back out a couple of turns to free the handle. You usually don’t remove it completely from the handle.
- Lift the handle straight up. If it’s stuck from mineral buildup, wiggle gently or apply penetrating oil around the base.
- Inspect and replace the screw if the threads or hex socket are damaged, then reverse the steps to reassemble.
When you reinstall, tighten the set screw snug but not gorilla-tight. Overtightening a small M4 screw into a zinc handle strips the threads instantly. Snug plus a quarter turn is plenty. If the handle still feels loose after tightening, the problem may be a worn valve stem or cartridge, not the screw — and that’s a different repair. A wobbly handle that leaks at the base often points to a failing cartridge, which is closely related to why a pull-out kitchen faucet leaks at the handle.
How do you remove a stripped or corroded faucet handle screw?
To remove a stripped set screw, first try a slightly larger hex key or a Torx bit tapped into the rounded socket for extra bite; if that fails, apply penetrating oil, let it sit 15–20 minutes, then use a screw extractor (easy-out) or grip the screw head with locking pliers if any of it protrudes. Corroded screws respond best to penetrating oil plus patience — heat from a hair dryer can also break a mineral bond.
Here’s your escalation ladder, from gentlest to most aggressive:
- Fresh, correct-size hex key, fully seated. Sounds obvious, but a worn key rounds the socket. Start with a brand-new one.
- Penetrating oil (PB Blaster, Liquid Wrench). Spray around the screw and the handle base, wait 15–20 minutes. This dissolves the mineral and corrosion « glue » that’s really holding it.
- Tap a Torx bit in. If the hex socket is rounded, a T-15 or T-20 Torx bit lightly hammered into the socket often grabs enough to back it out.
- Screw extractor / easy-out. For a fully stripped screw, drill a tiny pilot hole and use a left-hand extractor bit.
- Cut a slot. As a last resort, use a rotary tool to cut a shallow slot across the screw head and turn it with a flathead.
If the screw snaps off inside the handle, don’t panic — the handle itself is usually cheaper to replace than the hours you’d spend extracting a broken screw. Faucet manufacturers sell handle kits that include a fresh screw. If you’re facing decades-old, seized hardware, the same patient penetrating-oil approach that works on a stuck faucet body applies here; we cover the extreme version of that in our guide on removing a 20-year-old bathroom faucet that won’t budge.
Can you replace just the screw, or do you need a whole new handle?
In most cases you can replace just the screw — it’s a standard set screw, and swapping in a matching stainless one restores full function for under a dollar. You only need a new handle if the handle’s internal threads are stripped, the handle is cracked, or the set screw snapped off and can’t be extracted.
Decide with this quick check:
| Symptom | Fix | Rough cost |
|---|---|---|
| Screw is loose or backed out | Retighten it | $0 |
| Screw socket rounded / stripped | Replace the set screw | $0.50–$3 |
| Handle spins but doesn’t grip stem | New screw + check stem broaching | $1–$5 |
| Handle threads stripped or screw snapped inside | New handle kit | $10–$35 |
| Handle cracked or corroded through | New handle kit | $10–$35 |
One thing worth knowing: the valve stem the handle clamps onto has flat « broaching » splines. If those splines are worn round, even a perfect new screw won’t stop the handle from slipping — you’d then be looking at a cartridge or stem replacement. This is the same family of repair as a broader bathroom sink faucet handle replacement, where the diagnosis follows the exact same logic even though the parts differ slightly.
What tools and parts should you have on hand?
For a handle screw replacement you need very little: a set of Allen keys (imperial and metric), a small flathead screwdriver, and a replacement stainless set screw. Add penetrating oil and a screw extractor only if the original is stuck or stripped.
A realistic shopping and toolkit list:
- Allen/hex key set covering 3/32″, 7/64″, 1/8″, 2.5 mm, and 3 mm
- A short-arm or ball-end hex key (crucial for reaching handle screws at an angle)
- Small flathead screwdriver for the index cap
- Assortment of stainless set screws (10-24, 8-32, M4)
- Penetrating oil for corroded hardware
- Plumber’s grease to lightly coat the new screw threads (prevents future seizing)
- A rag and painter’s tape to protect the finish
A dab of plumber’s grease or anti-seize on the new screw’s threads is the single best thing you can do to make sure this repair lasts. It keeps water and minerals out of the threads so the next time you need to remove the handle — years from now — the screw backs out easily instead of seizing.
Does replacing the handle screw fix a dripping or leaking faucet?
Usually no — a loose handle screw makes the handle wobble or spin, but it rarely causes a drip. Drips and leaks almost always come from a worn cartridge, O-ring, or seat inside the valve, not from the handle screw. Tightening the screw fixes the feel of the handle; it doesn’t stop water getting past worn internal seals.
That said, a loose handle and a leak often show up together because both point to a faucet that’s aging. If your faucet drips from the spout or weeps around the base, the screw is a quick win but you’ll likely also need to look inside. If the leak is at the sprayer rather than the handle, that’s its own repair — see our walkthrough on fixing a leaking kitchen faucet sprayer yourself. Fix the screw first because it’s free and fast, then diagnose any remaining drip.
Author note & why you can trust this guide
This guide was written by the arcorarobinet fixtures team — we design, test, and sell kitchen and bathroom faucets, and we handle real customer repair questions every week, so the sizes and failure modes above come from actual returned parts and support tickets, not guesswork. Every arcorarobinet faucet handle set screw is machined from corrosion-resistant stainless and tested to the same durability standards our valves meet, and our faucets are backed by a limited lifetime warranty on the finish and function. If you’re ever unsure of the exact screw for your model, our support team can match it by model number rather than have you guess. When you buy replacement parts, always confirm they meet recognized plumbing standards (such as ASME/ANSI A112.18.1) so the fit and material quality are guaranteed.
FAQ
What size Allen key do I need for a kitchen faucet handle screw?
Most kitchen faucet handle set screws take a 7/64″ or 3/32″ hex key. Some imported or European faucets use 2.5 mm or 3 mm metric hex keys instead. If you’re not sure, try 3/32″ first — it fits the majority of single-lever US-market faucets — and always seat the key fully before turning to avoid stripping the screw.
Are kitchen faucet handle screws a universal size?
No. While 10-24 and M4 stainless set screws cover a large share of faucets, there’s no single universal size across brands. Moen, Delta, Kohler, and European makers each use slightly different threads and lengths. The safest approach is to remove the old screw and match it, or buy a small imperial-and-metric assortment pack so you have the right one on hand.
My faucet handle spins but the water doesn’t shut off — is it the screw?
It might be, but not always. First tighten or replace the set screw; if the handle grips again and controls the water, you’re done. If the handle still spins freely after tightening, the valve stem’s splines (broaching) are likely worn round or the cartridge is failing, which means a cartridge or stem replacement rather than just a screw.
What do I do if the set screw is stripped and won’t come out?
Spray penetrating oil and wait 15–20 minutes, then try a fresh, fully-seated hex key or tap a Torx bit into the rounded socket for extra grip. If that fails, use a screw extractor (easy-out) or grip any protruding part with locking pliers. If the screw snaps off inside, replacing the whole handle kit is usually faster and cheaper than extraction.
Should I use a brass or stainless replacement screw?
Use stainless steel. The original screw is often zinc or brass, which corrodes and seizes in the humid environment under a sink. A stainless set screw resists rust, and a light coat of plumber’s grease on the threads keeps it easy to remove years later. Just make sure the stainless screw matches the original thread size and length.
Can I replace the handle screw without turning off the water?
Yes, if you’re only tightening or swapping the set screw and not pulling the cartridge, you can leave the water on because the valve stays sealed. However, if you plan to fully remove the handle to inspect the stem or cartridge, shut off the two supply valves under the sink and open the faucet to relieve pressure first, just to be safe.



您好!Veuillez vous connecter