 ARCORA ROBINETS
Is a Vintage Pot Filler Faucet Worth Installing Over Your Stove in 2026?
Vues:1 ClassificationProduct
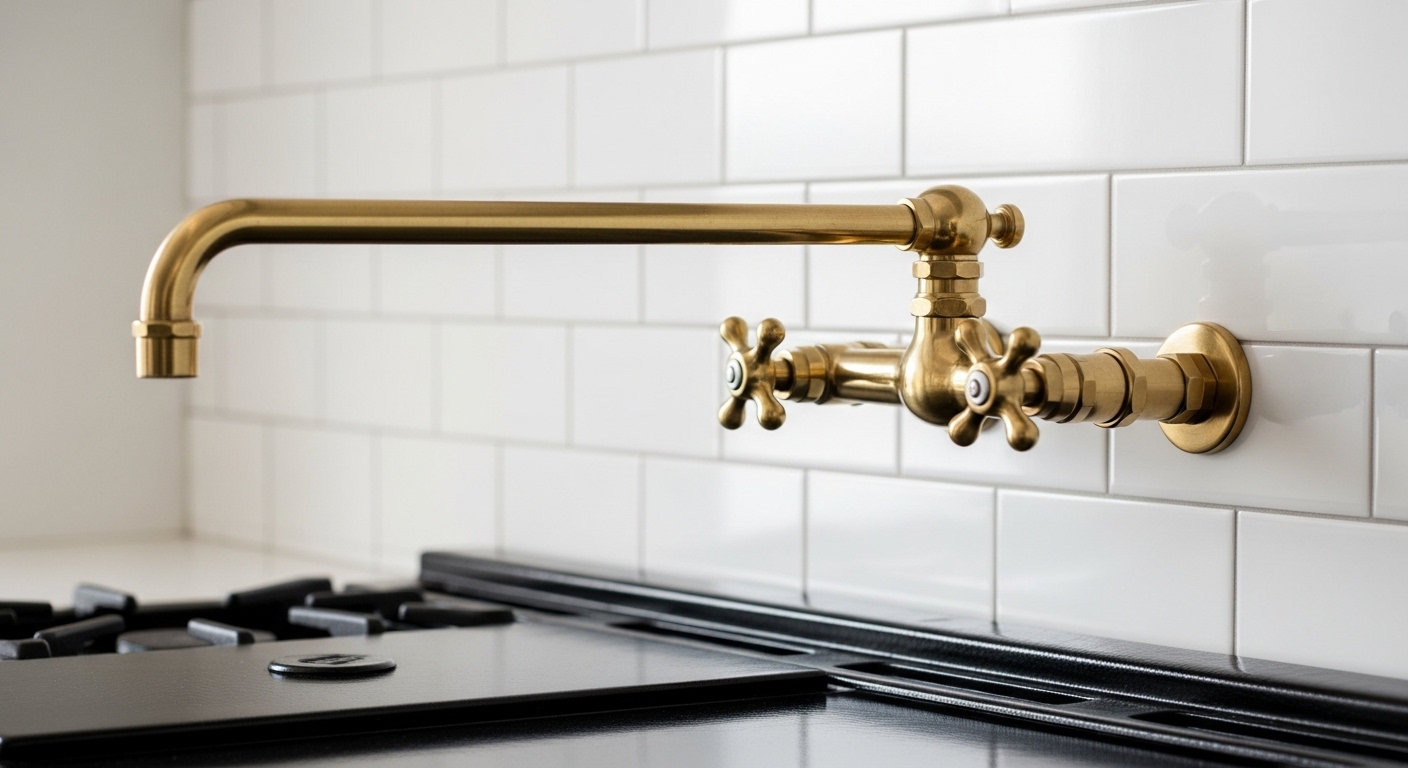
A vintage pot filler faucet is a wall-mounted (or deck-mounted) cold-water tap installed above your cooktop, styled to look like an early-1900s industrial or farmhouse fixture — think exposed cross handles, a hand-burnished bronze or unlacquered brass finish, and a long articulating arm that folds flat against the wall when you’re not using it. Functionally it’s identical to a modern pot filler; the « vintage » part is purely about the finish, handle style, and detailing that make it feel like it belongs in a heritage kitchen rather than a stainless-steel commercial one. If you’re renovating a Craftsman, Victorian, farmhouse, or transitional kitchen and want the convenience without the sleek modern look clashing with your range, this is the fixture built for you.
Below I’ll walk through exactly who should buy one, what it should cost, the finishes and valves that actually last, and how to install it correctly — the same questions I get asked over and over by homeowners speccing their first pot filler.
What exactly is a vintage pot filler faucet, and how is it different from a regular one?
A vintage pot filler is a pot filler with heritage styling — the plumbing and mechanics are the same, but the aesthetics are drawn from pre-war kitchen hardware. The core job never changes: it’s a cold-water-only faucet positioned over your stove so you can fill pots in place instead of carrying them from the sink.
What makes one « vintage » rather than « modern » comes down to a few concrete details:
- Handles: Vintage models use lever or four-spoke cross handles, often with porcelain « HOT/COLD » buttons (even though a pot filler is cold-only, the cross handle look is period-correct). Modern ones use smooth paddle levers.
- Finish: Unlacquered/living brass, antique bronze, oil-rubbed bronze, and aged copper dominate the vintage category. Modern pot fillers lean toward polished chrome, matte black, and stainless.
- Arm construction: Vintage arms show visible knuckle joints and hex fittings rather than the seamless tubing you see on contemporary units.
- Escutcheon: Heritage models often have a round, slightly domed wall plate rather than a flat modern disc.
Mechanically, though, every good pot filler — vintage or not — shares the same anatomy: a double-jointed articulating arm (so it reaches across a wide cooktop and folds back), a ceramic-disc cartridge valve at the wall, and ideally a second valve at the spout head so you have two shut-off points. That dual-valve design is a genuine safety and convenience feature, not marketing fluff — more on that below.
Do you actually need a pot filler, or is it just a trend?
You need one if you regularly cook with pots too heavy to comfortably carry full — think 8-quart-plus stockpots, canning kettles, or large pasta pots. For everyone else it’s a genuine luxury convenience, not a necessity, and that’s an honest answer.
Here’s the real-world math. A 12-quart stockpot filled with water weighs roughly 25 pounds. Carrying that from a sink 6–8 feet away, then lifting it onto a burner, is exactly how people strain their backs and slosh boiling-hot water later. A pot filler eliminates the carry entirely — you fill on the burner. If you cook big-batch soups, boil seafood, blanch vegetables in bulk, brew, or can produce every fall, the fixture pays for itself in convenience within a season.
Where it’s overkill: a small apartment kitchen where the stove and sink are within arm’s reach, or a household that mostly reheats and pan-fries. In those cases the plumbing run and wall opening aren’t worth it. Be honest with yourself about how you cook. And remember — a pot filler only fills; it doesn’t drain. You still empty pots at the sink, so it complements your sink faucet, it never replaces it.
What finish should you pick for a vintage look — and which one holds up?
For an authentic vintage look that also survives the grease, steam, and heat above a stove, oil-rubbed bronze and antique brass are the safest picks; true unlacquered « living » brass is the most authentic but demands that you accept a natural patina. The finish you choose is the single biggest driver of both the vintage feel and the long-term maintenance.
The area above a cooktop is a harsh environment — airborne cooking oil, constant temperature swings, and steam. That matters more here than for a bathroom faucet. Here’s how the common vintage finishes actually behave:
| Finish | Vintage authenticity | Maintenance over a stove | Best for |
|---|---|---|---|
| Unlacquered / living brass | Highest — ages naturally | High — patinas fast, wipe often or embrace it | Purists who want a genuinely aging fixture |
| Oil-rubbed bronze (ORB) | High | Low — hides water spots and grease well | Farmhouse & Craftsman kitchens |
| Antique / aged brass (lacquered) | High | Low — sealed, stays consistent | Warm traditional kitchens, low upkeep |
| Aged / antique copper | High | Medium — patinas, shows fingerprints | Rustic and cottage kitchens |
| Polished nickel | Medium — softer than chrome | Medium — shows water spots | Transitional & Victorian kitchens |
My practical advice: if you love the raw-brass look but hate the idea of upkeep, buy a lacquered antique brass — you get 90% of the vintage warmth with a fraction of the maintenance. If you want the finish to develop character and tell a story, go unlacquered and stop fighting it. One more tip — match the pot filler to your range hardware and cabinet pulls, not to your sink faucet across the room; the eye reads the stove zone as one unit. If your finish ever gets a worn spot, our guide on the best oil rubbed bronze faucet touch-up paint covers matching and repair, and if you’re weighing whether ORB still reads as current, see whether oil-rubbed bronze is modern enough for a 2026 remodel.
Wall-mounted vs. deck-mounted vintage pot filler — which is right for my kitchen?
Choose wall-mounted if your stove sits against a wall with a backsplash — that’s about 90% of kitchens and gives the classic vintage look. Choose deck-mounted only if you have a cooktop in an island or peninsula with no wall behind it.
Wall-mounted is the default and the more authentic vintage choice. It requires a cold-water supply line run inside the wall behind your backsplash, terminating at the mounting point, usually 4–6 inches above the cooktop surface. The visible arm folds flat when idle, so it takes up no counter space.
Deck-mounted pot fillers rise from the countertop beside the cooktop. They’re the solution for island ranges where you simply can’t run a line to a wall. They’re less common in vintage styling but they do exist, and they fold down toward the counter. The trade-off: they occupy a bit of counter real estate and the base is another spot to clean around.
- Confirm your stove location first. Wall-adjacent range → wall mount. Island cooktop → deck mount.
- Check the reach. Measure from the mount point to your farthest back burner. A quality double-jointed arm extends 20–24 inches; make sure it clears all burners.
- Set the height. The spout should clear your tallest stockpot with room to fill — typically position the outlet so there’s at least 14–16 inches of clearance above the burner grate.
How much should a good vintage pot filler faucet cost in 2026?
Expect to pay $150–$450 for a quality solid-brass vintage pot filler with a ceramic-disc valve; below about $120 you’re usually looking at thin brass or zinc-alloy bodies that corrode over a stove, and above $450 you’re paying for designer branding more than function.
Price tracks a few concrete things: the base metal (solid forged brass costs more than zinc alloy but lasts decades), the valve type (ceramic disc beats rubber-washer compression every time), the finish process (hand-applied living finishes and genuine ORB cost more than sprayed coatings), and whether it has dual shut-off valves. Here’s how the tiers break down:
| Price tier | What you get | Watch out for |
|---|---|---|
| Under $120 | Zinc-alloy or thin brass body, single valve, basic finish | Corrosion over a stove, sticky handles within 2–3 years |
| $150–$300 | Solid brass, ceramic-disc cartridge, dual shut-offs, real vintage finish | The sweet spot — verify « solid brass » not « brass finish » |
| $300–$450 | Heavy forged brass, premium living finishes, longer warranty | Great quality; make sure you’re paying for build, not just a name |
| $450+ | Designer/imported brands, artisan finishes | Diminishing returns on function; mostly brand premium |
The phrase to hunt for on the spec sheet is « solid brass body » — not « brass finish » or « brass-plated, » which usually means zinc underneath. Solid brass resists the corrosive stove environment and holds threads better for a lifetime of use. The same solid-brass logic is why plumbers spec it for demanding jobs like a brass faucet for a utility sink in commercial settings, where the fixture takes daily abuse.
How do you install a vintage pot filler, and can you DIY it?
You can DIY the faucet mounting itself if the cold-water rough-in is already in the wall, but running that new supply line into a finished wall is a job for a licensed plumber. Never connect a pot filler to a hot line — it’s cold-water only.
The realistic breakdown: getting a cold-water supply to the right spot behind your backsplash means opening the wall, tapping a line, and pressure-testing it — that’s plumbing-permit territory in most areas and worth hiring out, ideally scheduled during a remodel when the wall is already open. Once the threaded stub-out and mounting bracket are in place, attaching the pot filler itself is straightforward for a confident DIYer.
- Shut off the water and confirm the rough-in line is capped and pressure-tested.
- Wrap the male threads with PTFE (plumber’s) tape — 3 to 4 wraps, clockwise.
- Thread the pot filler body onto the stub-out hand-tight, then snug with a wrench, protecting the finish with a cloth to avoid scratching the vintage plating.
- Align the arm horizontally and secure the escutcheon flush to the backsplash.
- Turn the water back on slowly and check for weeping at the joint. Open and close both valves to confirm the ceramic cartridges seat cleanly.
- Test the fold. Extend and retract the arm fully to confirm it clears every burner and folds flat.
If you’re comfortable swapping fixtures, this is on par with other confident-homeowner plumbing jobs — similar skill level to learning how to remove old taps from a sink without wrecking the plumbing. When in doubt about the in-wall supply, hire the plumber; it’s cheap insurance against a leak inside a finished wall above your stove.
Why do the dual shut-off valves matter so much?
The two valves matter because they give you redundancy against leaks and let you position the flow precisely — the valve at the wall is your master shut-off, and the valve at the spout head controls day-to-day filling. If a cartridge ever fails, you close the wall valve and you’re not flooding the burner while you wait on a part.
This is one of the details that separates a well-built vintage pot filler from a cheap one. Both valves should be ceramic-disc cartridges, not old-style rubber compression washers. Ceramic discs handle tens of thousands of open/close cycles without wearing out, don’t drip as they age, and shrug off the mineral content in hard water far better. Rubber washers, by contrast, harden and crack — that’s the number-one reason budget faucets start dripping. If you want to understand why this valve technology is the industry benchmark, our roundup of the best kitchen faucets with ceramic valves breaks it down in detail. And if you’re tracking where the category is heading aesthetically, our kitchen tap trends 2026 guide shows how warm vintage finishes are firmly back in style.
FAQ
Can a vintage pot filler faucet dispense hot water?
No. Pot fillers — vintage or modern — are cold-water-only fixtures by design and code. They connect to a single cold supply line. Boiling happens on the burner, so there’s no reason (and no plumbing provision) for hot water. If a listing claims a pot filler runs hot and cold, it’s mislabeled — walk away.
Will a vintage pot filler drip onto my stove when I’m not using it?
It shouldn’t, and that’s exactly why the dual ceramic-disc valve design matters. With both valves closed, a quality unit stays bone-dry over the burner. Occasional dripping is almost always a sign of a worn rubber washer in a budget model or a cartridge that needs replacing — one more reason to buy ceramic-disc valves from the start.
How high above the stove should I mount a pot filler?
Mount it so the spout outlet sits at least 14–16 inches above the burner grates — enough clearance to slide your tallest stockpot underneath and still fill it. Wall-mount rough-ins typically land 4–6 inches above the backsplash surface. Always measure against your own largest pot before setting the height.
Is unlacquered brass a bad idea over a greasy stove?
Not bad — just high-maintenance, and it depends on your taste. Unlacquered « living » brass will patina faster above a stove because of the heat and airborne oils. Purists love that evolving character; if you want a consistent look with minimal fuss, choose a lacquered antique brass or oil-rubbed bronze instead, both of which hide grease and water spots well.
Does a vintage pot filler add real resale value?
It adds appeal more than a guaranteed dollar figure. In a period-style or high-end kitchen, a tasteful vintage pot filler signals a thoughtful, cook-focused renovation and photographs beautifully in listings — buyers notice it. It’s a value-supporting detail, not a standalone investment, and it lands best when the finish matches the rest of your kitchen hardware.
Solid brass vs. stainless steel — which lasts longer over a cooktop?
Both last for decades if well made, but solid forged brass is the traditional choice for vintage styling and resists corrosion beautifully in the humid, greasy stove zone. Stainless suits modern kitchens. For a vintage look, solid brass under an ORB, antique-brass, or living finish is the right call — just confirm it’s solid brass, not brass-plated zinc.
About the author: This guide was written by the arcorarobinet product team — plumbing-fixture specialists who have spec’d, tested, and installed kitchen and bath faucets for over a decade. We evaluate pot fillers for valve durability, brass content, and finish wear before recommending them.
Why trust arcorarobinet: arcorarobinet designs and sells faucets and bathroom fixtures direct to homeowners and trade buyers, with an in-house quality team that pressure-tests every valve design. Our pot fillers use ceramic-disc cartridges rated for tens of thousands of cycles, are built from solid brass, and are backed by a limited lifetime warranty against manufacturing and finish defects, meeting standard North American plumbing certifications for lead-free (NSF/ANSI 372) drinking-water fixtures.



您好!Veuillez vous connecter